Do you need special stirrup leathers for a treeless saddle?

The short answer is yes.

A traditional treed English saddle has a recessed metal stirrup bar affixed to the tree of the saddle. It is recessed into the tree so when the buckle of the English stirrup leather is right up against the stirrup bar, you won’t feel it under your thigh. It is covered with a small skirt of leather. Sometimes this still results in a bulge over the buckle, but it’s slight, and most people can tolerate the small lump under their thigh.

Treeless saddles do not have a tree, and therefore the stirrup attachment is most often under the seat. If you put your English stirrup leathers under the seat in the traditional way, the buckle will be a lump right under your thigh and you will be very uncomfortable. The solution is to put the buckle of the stirrup leather down by your ankle.

StirrupLeathers
Barefoot English Stirrup Leathers with buckle down by the ankle and stirrup leather keeper.

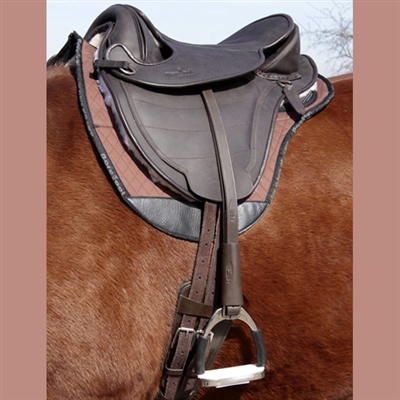
Basically, you are turning the English stirrup leathers upside down. Under your seat will only be the fold of the leather, and it will lie flat and not bother you. Now that you have the buckle down by your ankle, what do you do with the excess ends of the leathers so they don’t flop around?

To answer this question, the illustration below works better than words. Simply tuck the ends of the leathers back into the buckle and then between the two layers of leather and slide a stirrup keeper over the whole thing to keep everything neat and tidy. Ta-da!

BarefootDiagramAttachStirrups


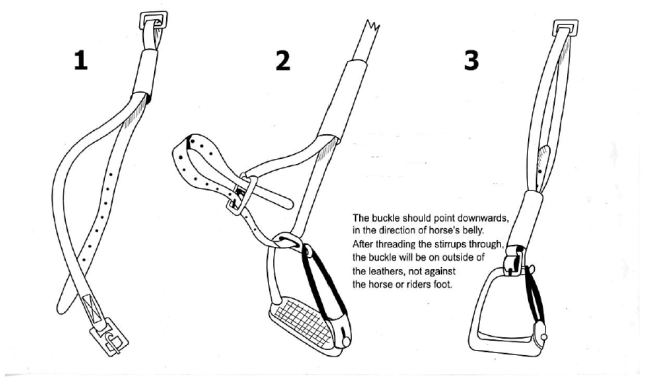
Barefoot English Stirrup Leathers are rigged so the buckle is at the ankle and comes complete with the stirrup leather keeper. They are nylon lined so they won’t stretch, and made with soft and pliable leather for comfort.


40-ART003-2T
Action Rider Stirrup Leather Keepers

You can use regular English stirrup leathers with a treeless saddle if you put them on as the above illustration shows. You can purchase the Action Rider Stirrup Leather Keeper separately.


A traditional western saddle with fenders has the buckle for adjustments down by the ankle. The western or endurance fenders for a treeless saddle has a similar design. It is important for the top of the fender to be thin and pliable enough for it to lay smoothly under the seat of the western treeless saddle. The Barefoot Western Fenders and Barefoot Endurance Fenders are made with a nylon section that goes through the stirrup attachment to allow it to lay as flat as possible under the seat.

In Conclusion

The most important element for success with your English stirrup leathers, western fenders or endurance fenders with a treeless saddle is to eliminate the bulk of the buckles from under your thigh. To do this, the buckles need to be positioned down just above the stirrup, near your ankle. The result will be a smooth transition under your leg and you will be comfortable and in close contact with your horse.


Training Your Horse to Canter

“A canter is the cure for every evil.” ~ Benjamin Disraeli

This lovely buckskin is cantering on the right lead. This horse is in beat 2 of the 3-beat canter. The diagonal pair of legs – left front and right hind, are on the ground together. Beat 3 will be the right foreleg striking the ground.

The canter is indeed high on the list as one of the thrills while riding a horse. The three-beat rocking horse canter with a brief moment of being airborne can be one of those memorable feel-good experiences, logged in the brain for life.

A calm canter depart is the start of developing this dreamy gait. When working with a young horse, or one that is reluctant to break into the canter, be sure to approach the subject in an unhurried fashion and have a plan.

In a western or English saddle, an easy way to get a canter depart is from a very active forward posting trot without rushing your steed off his feet. Establish your forward trot and choosing the direction that your horse prefers, head for a corner of your arena and make a gentle curving line. At some point, the horse will want to break into canter; it’s less work than a butt-busting trot. Don’t stop posting and take advantage of that moment by applying your cue for the canter. If your horse just trots faster slow him back down and ask again. Sometimes, if you ask for a strong forward trot, then slow down the trot slightly and sit to apply the cue for the canter, it will encourage your horse to strike off into the canter.

The canter is a 3-beat gait. If you are making a circle to the right, the inside is the right side of the horse, and the outside is the left side of the horse. Beat 1 is the left hind leg, or outside hind, striking off. Beat 2 is the diagonal pair of legs that move together – the inside right hind and the outside left foreleg. Beat 3 is the right foreleg – the inside foreleg – and when going to the right, the horse will be in better balance especially while on a circle to the right. We say the horse is on the correct lead, because the inside or right foreleg is the leading leg that goes more forward than the other foreleg in this gait. Beat 3 is followed by a moment of suspension when all four feet are off the ground.

Most riders ask for the canter by slightly moving the outside leg back and squeezing it against the horse’s side. This is because you are asking for the outside hind leg to strike off to begin the canter, resulting in the horse’s leading leg to be on the inside to be in better balance.

If you ask your horse to canter, and he strikes off on the wrong lead – do nothing – you’re cantering! The horse obliged with the correct gait. Let him canter for a bit. Then you can break back to trot, rev-up the engine again if necessary, and try the canter again until you get the correct lead. When you do, tell him what a genius he is! You’ll find that your horse progressively begins to pick up the correct lead more often, until right and left leads are firmly established.

After you have established a smooth canter depart from the trot and you are sure your horse understands the canter aid; you can try asking for it from a walk. Without hurrying, establish a forward-marching balanced walk that feels like it has a bit of bounce to it. You will probably experience some trot strides before getting the canter, but with repetition, the number of trot strides will diminish until your horse can strike off into the canter directly from the walk.

When you train the canter in this fashion, and all is going to plan, the horse seamlessly slides into it without rushing. If you establish the forward energetic trot or walk before asking for canter, you won’t have to kick, use a crop or spur, and all will be well. If things don’t go to plan – no worries. Take a break, re-organize yourself, establish that wonderful walk or trot and try again. Your confidence will make it happen.

Going Forward – It’s Everything!

BarefootArizonaRobinWhite500Training your horse to move forward willing and dependably is the most important element to having a responsive and well-behaved horse. Most behavior problems begin with your horse’s resistance to the forward aids – your legs and seat. Severe resistance to the forward aids can result in bucking, rearing, shying, balking, and being unwilling to leave other horses or leave the barn. These are serious issues, but the cure is to go back to square one – your horse’s response to the go forward aids.

Going forward dependably is also a safety issue. If there is a scary monster in the bushes, your horse still has to listen to your go forward command to get past it. He might not like it, he might be tense and wild eyed, but if he continues to obey the forward aids, you can still make it past the obstacle. Going forward when asked is not a suggestion, or a guideline. It’s a hard and fast rule. It effects how your horse steers as well. Like a sail boat, you can’t steer a horse if he’s not in motion. I like to turn my horse’s head slightly away from the monster in the bushes, but continue it a straight line until we’re in the clear.

If you have trained a young horse, or started him under saddle, you have experienced that the green horse is so difficult to ride because his gas pedal is sticky. He goes forward, then the motor cuts out, then he doesn’t steer. Repeat. It’s rarely a problem that you cannot slow down or stop your young horse, he gets that pretty quickly. An experienced rider can get the horse moving forward with their aids, their energy and their mind. Everything about their attitude in the saddle says let’s go forward with consistency without blocking the way forward with hands or a body that cannot follow the forward motion smoothly. After many rides, the young horse learns that it’s fun to go forward in harmony with a rider, and through repetition and reward, and perhaps backed up with a crop on occasion, he learns that going forward is a way of life. Only then can you start bending and flexing, and introduce side way movements, because there is forward energy and motion to work with.

Every successful training moment that you make it past the barking dog, the plastic bag, and the parked car, builds your horse’s confidence in you. You are in charge and if you say go – it is safe. He learns to trust your leadership until finally; there is no resistance to anything. You are a team that can go anywhere! That is what we call a well-broke or fully trained horse. It does take time to get there – but it is so worth it.

It’s a good idea to revisit your horse’s response to the forward aids in the arena throughout his lifetime. I like to get on a big circle and go from trot to walk to trot to walk. Those transitions reinforce the go forward command, and sharpen his response with immediate compliance. Then I do the same thing with trot to canter to trot to canter – reviewing the response to the canter aid. Then really mix it up with a halt to trot to canter to walk to trot and back to halt. Gas pedal, steering wheel and brakes all functioning properly? Then you’re ready to go hit the trail again.

Training a Relaxed and Happy Trail Horse

RidersTrailKerrits

Out on the trail is not the ideal time to train. That’s why we ride in an arena in a controlled environment. If you don’t have a fenced arena, create yourself a training area by roping off a section of your pasture, or put logs or poles on the ground to cordon off your training space. It’s not fun to discover that your horse’s brakes don’t work all that well when you pick up the canter with a couple of your riding cronies. Just as dangerous as no brakes is a sticky gas pedal. Your horse must know that going forward when asked is not a negotiable request. You can check your horse’s response to your aids by testing him in the arena. Take every opportunity to ride through the puddle, past the flapping jacket on the arena gait, walking over ground poles, riding in company and by yourself. Once you feel you are completely in charge and are comfortable with your horse’s response and cooperation in all gaits, you are ready to venture out.

Going out on the trail should mean a relaxing time for your horse. When you start out with a young horse, a new horse, or tuning up your horse, take baby steps to develop your horse’s attitude about the trail. You should first establish that trail riding means walking. Go for a short walk at the end of an arena session. Your horse is in a great state of mind to relax and just walk to cool down. Your first trail rides can be around the barn and around the property. Make the ride in a circular pattern. Don’t go out in one direction, make a 180, and then head straight back that might encourage anticipating returning home.

With your riding buddies, take turns leading the way, riding in the middle and following. If your horse acts up in any one of these positions, change back to his comfort zone position, and then give him short doses of what he doesn’t like. That way he doesn’t work himself up, and stays in a relaxed state of mind. Eventually you should be able to ride anywhere you like.

Increase the distance and time of your trail rides by increasing the circumference of your circle. Around the barn, over the hill, and back down the road. Then around the barn, over the hill, across the road to the next field and then back down the road. You get the idea. You and your horse will have no worries as the next steps are never too challenging. Follow a riding buddy to help you across the creek for the first time. Always set yourself up for success.

Once your horse proves to you he knows the trail is for relaxation, you can pick up the trot somewhere in the middle of your ride for a short period. Return to walk to be sure your horse maintains his calm walking demeanor. After several weeks, or months, you can add a loping or canter session keeping an eye on his attitude. Always quit while you’re ahead, there is always another ride tomorrow. Taking the time to advance your rides with baby steps can help the development of your laid-back and happy trail horse. And the old saying, “walk the first and last mile” is still sound advice.

What’s in YOUR Saddle Bag?

LindsayNicholsBarefootAtlantaLIVE
This gorgeous trail riding photo was shared by Action Rider Lindsay Nichols

What should you carry in your saddle bag? The length of your ride and whether you are going on familiar trails or exploring new horizons will obviously have some bearing on what you take with you. Although it is impossible to carry everything for every emergency scenario, there are some practical items that are often needed and can really come in handy.

Here are some suggestions of practical items to consider putting in your saddle bag: Water, water purification tablets, fly repellent, trail mix, wire cutting tool, sunglasses, tissue, camera, small flashlight, pepper spray, hoof pick, Band-Aids, Dy’s Liquid bandage, Vetrap, pain reliever, antihistamine, bear bell or little bells to ward off critters, an Easyboot, folding water bucket, folding saw to cut branches and trees from blocked trail, Multi-purpose tool, pocket knife, signal whistle, map, and compass.

There is a First Aid Kit available that comes in a soft pack that fits in most saddle bags. It includes 40 items including a First Aid Guide, bandages, gauze pads, butterfly closures, wound dressing, antiseptic towellets, Povidone-iodine prep pads, needle, moleskin, safety pin, and latex gloves. There is also a small item that can make a difference for your safety, it’s Rein Safe. It prevents you from loosing your reins when your horse takes a drink from a stream, or you take a photo and drop your reins for a moment.

What size saddle bag should you carry? There is a huge selection of fabrics, styles, and sizes of saddle bags, carriers and ties that attach to your English, western, endurance or Aussie saddle and saddle pads with pockets. If you become separated from your horse, there are carriers that attach to your ankle, wrist or waist for your cell phone.

In the event that you did not take something for an emergency that arises while out on trail, and your cell phone has no service, be sure you have told someone where you are going to ride and approximately how long you will be gone. Then if you don’t show up back at the barn, someone will know where to look for you.

ActionRiderTack.com has an extensive selection of trail riding gear for trail riders and their horses.

A Challenging Horse and a Never Quit Attitude

PamelaKarner500
Castlebar Link in an 80K ride in Killarney, NSW Australia with Pamela Karner riding in her Barefoot Lexington Treeless Dressage Saddle.

Pamela Karner is an endurance rider and an equine veterinarian. She has had quite an eventful time with her endurance gelding, Castlebar Link, or Link for short. Even after several serious accidents, Pam has persevered and continues to ride, train and plan for her next endurance ride with Link, a beautiful chestnut Anglo-Arabian.

Pam travels to Australia every winter, and that is where she found Link. Pam explains, “I picked Castlebar Link out as a three-year-old from a large, very successful endurance stud. They kept him over the winter and sent him to their trainer for four weeks. I picked him up the following year when I was back in Australia. That year he broke my leg, knee, and ankle with an explosive move while I was on the ground! I had never been hurt like that in 30-plus years of my large animal veterinary practice!”

”The following year he broke his splint bone in the pasture and required surgery,” she continues. “So we were even, both broken once. His six-year-old year he dumped me and I refused to let go of the long split reins, as I was alone in the Australian bush. His response was to double barrel the creature scaring him from behind… thus another hospital visit and surgery.

“The next two years I was determined to go back and start over with this affectionate, lovely horse who was fantastic to ride 99% of the time, but when frightened was over the top explosive. My natural horsemanship friend and coach here in the US was very helpful.

“Link has gradually come along. He is still not a horse to take for granted! We have managed to successfully ride multiple 40K rides and 4,80K rides. I am hoping that he will be ready for the Quilty 100-mile ride next year! It is a challenge in many ways. Link gets 7 months off every year. I start him back every December and leave early May!”

The First Rides of Spring – Keep It Safe!

The rain and snow have slacked off, the weather is warming up, and the trail beckons. You put a date on the calendar to go ride with your favorite horse buddies. You anticipate the day’s ride coming up with visions of a warm spring breeze on your face, green grass and spring flowers abound, and your horse’s mane and tail gently blowing in the wind. You sigh…., “I can’t wait until this weekend.”

Sandy Cheek
Photo: Endurance Action Rider, Sandy Cheek

The first rides of spring can be glorious. But be sure to take some precautionary steps to avoid unwanted surprises. Most importantly, check the frame of mind of your horse! The completely dependable trail horse that you put away in November for his yearly time off, may not prove himself to be all that dependable the first couple of rides out.

Start off with some round pen work, or put him on a lunge line if you don’t have a round pen or arena. Watch how he moves at all three gaits keeping your eye out for soundness issues. How exuberant is he? Perhaps several days of lungeing are in order. Saddle him up and send him around some more. Has he lost or gained weight? Does the saddle still sit level? Girth still fits?

Then, choose an easy trail with good footing. If it’s too muddy, consider going a different way. It’s safer and doesn’t chop up the trails for the rest of the year. Be sure and give your horse some breaks if he gets winded, and gradually increase the length and difficulty of the trails as you both get back in shape. Watch for chicks and cubs who might be hanging around their nests and dens. Protective mothers in the wild are not to be messed with.

Don’t’ forget to stop and smell the roses.  And pack your sheepskin seat saver; you may need it after an hour or so! Happy Trails!

Tito: A Modernized Gaucho

TitoBarefootAtlanta
Tito at work on a ranch in Argentina.

Mariano Fernandez has a ranch in Argentina. He raises cattle and sheep and has about twenty ranch horses – real working horses that help to move the livestock. But this story is not about Mariano. It’s about his ranch hand, Tito.

Tito has been working on Mariano’s ranch for the last twenty-eight years. He is seventy-two years old, fit and lean and weighs in at 120 pounds soaking wet. Mariano describes Tito as a true representative of an Argentine gaucho.

Historically the gaucho of Argentina was known to be a skilled horseman who worked cattle. The gauchos of the Buenos Aires pampas, or grasslands, have been recorded as saying, “A man without a horse is a man without legs.” The Argentinean Criollo horse comes from the Andalusian and Arabian horses imported by the Spanish conquerors centuries ago. These wild horses adapted to the harsh conditions of the pampas and are tough and known for their endurance.

Mariano shared this story about Tito. “Eighteen years ago Tito was riding on horseback, probably chasing some animal. His horse put one of the front feet in an armadillo hole and rolled over. This resulted in a broken hip for Tito, the horse didn’t get hurt. Apparently Tito’s hip bones didn’t heal the same way they were so from that point on, he sort of rides slanted to the right side. The funny thing is that you tell him that and he doesn’t acknowledge it. I’m saying this because if you look at the saddle, you can see that it has been definitely ridden off balance. A very non-advisable thing to do with a treeless saddle in particular.

TitoWeb
Tito, 72 years old, still working and riding ranch horses.

“Typical Argentine saddles in this area are called recado,” Mariano explains. “It is a succession of layers without any hard structure. You basically have a sweat pad, one or two wool pads, a leather pad, the “saddle” and on top of that a sheepskin.  This recado saddle is very comfortable for the rider but it is usually not very good for the horse. The most common problems are pressure points and galling of the withers. Most people don’t wash the sweat pad so that results in even bigger problems.”

Traditionally the gaucho’s recado, a multi-layer design, was built with local available materials – leather and wool. When the gauchos are out on the pampas, the recado saddles can be disassembled and used as a sleeping bag when needed.

Mariano continues, “Tito rides different horses. There are about fifteen to twenty ranch horses and we rotate them in groups of four every shoeing cycle. We wanted to give Tito a saddle that was comfortable for him and the horse, but also adaptable to every horse that we have.

“Tito is seventy-two years old and has been working with us since we bought the ranch in 1990.  He uses the horses to move cattle, sheep and muster deer as well.  During the hunting season he also guides hunters on horseback. He is a true representative of a gaucho but now modernized with a Barefoot Atlanta Treeless Saddle. Everybody that meets him believes that he was born one century too late.”

When Should You Replace Your Helmet?

According to Equus Magazine, “It’s a standard rule to discard any helmet that was struck hard in a fall. As a general rule, it’s best to get a new helmet every five or six years—replace your helmet sooner if it’s been exposed to extreme temperatures or chemicals like those found in automatic fly spray dispensers.” TipperaryHelmetsLIVE2

It’s also common sense to replace a helmet with any visible signs of wear and tear on the harness, chin strap or clips, or cracking, peeling, or dents.

Don’t need to replace your helmet?
9 Tips for Care and Cleaning your Helmet.
  • Most helmets have a liner that you can remove. You can then hand wash this liner with cold water and mild soap. Allow to air dry completely away from the sun.
  • Clean the exterior with a soft cloth, and brush the interior with a soft tooth brush. You can use cold water and mild soap on the exterior if it’s plastic. If it’s a leather exterior, use a dark damp cloth. and a bit of leather cleaner if necessary.
  • Let your helmet air dry, but not in the sun, after each use and after cleaning.
  • You can use compressed air to clean the helmet’s vents and channels.
  • Do not machine wash, put in dish washer, or dry clean.
  • DO NOT use or spray any products other than mild soap on your helmet. The chemicals can ruin the protective coating and compromise the integrity of the helmet.
  • Store your helmet away from direct sun, chemicals, solvents, bug sprays, cleaning products, or fertilizers. Do not store your helmet in your car where temperatures can exceed 100 degrees.

    KaidynonPony
    Action Rider Kaidyn Griggs
  • Store your helmet in a bag that has ventilation so it can dry out between uses. This will also help keep it clean.
  • To keep your helmet smelling fresh and clean, throw a dryer sheet into your helmet bag.

Be safe, have fun, always wear your helmet.

What is Mud Fever?

I have read some articles about horses and mud fever, and the emphasis of the articles often refers to mud fever on the back of the horse’s pasterns, just above the heels. In my horsey life, this pastern dermatitis is called scratches, greasy heels or cracked heels. However, when I was studying to become a British Horse Society Instructor in England, we referred to mud fever as a general irritation or bacterial infection of the skin most often found on the legs and belly. And as the name suggests, it is caused by continual moisture and mud, that can break down the natural protective layer the skins provides. Constant moisture softens the skin and the continual abrasive soil, sand or grit can permeate the skin’s protective barrier allowing bacteria to grow and become a problem.

KidPonyMud
Photo credit: Pinterest

To prevent mud from penetrating the skin, causing mud fever’s bacterial infection, you can do a couple of things. Follow this first and foremost rule of grooming: Do not brush wet mud. Especially after riding your horse through the mud, and the horse is still warm and skin pores are open. It is tempting to use a stiff brush to get the mud off. However, you must let it dry thoroughly before brushing it off. You could hose it off, but often in the winter and early spring when there’s mud, it’s too cold, and the horse will be wet, cold and take a long time to dry.

If you have a barn stall or covered shelter, put your muddy horse inside your clean, dry enclosure and let him dry off, even if it takes until the next day. Then you can brush the dry mud gently off his belly, legs, and don’t forget the back of the pasterns. Keeping your horse’s coat and skin clean and dry is the best preventative measure against mud fever.